


Wood engraving has a long history, dating back centuries. With the advent of technology, CNC machines and laser engraving machines have become the center of attention. They make the tedious task of carving easy. Now we can achieve more detailed designs with excellent accuracy.
This blog is intended to introduce top 7 methods to engrave wood. From ancient hand engraving techniques to the latest laser engraving, you'll learn all the tools and steps required for each method.

In this article:
- Method 1: Laser Engrave Wood (Laser Engraving Machine)
- Method 2: Engrave Wood by Hand (Carving)
- Method 3: Engrave Wood with A Dremel (Power Tool)
- Method 4: Engrave Wood with Cricut Maker (Blade Engraving Machine)
- Method 5: Engrave Wood with A CNC Router
- Method 6: Wood Burning (Pyrography)
- Method 7: Kolrosing Wood Engraving
- FAQs About Wood Engraving
Method 1: Laser Engrave Wood (Laser Engraving Machine)
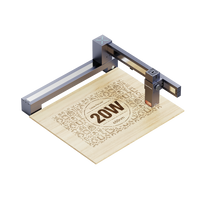
Laser engraving on wood is a modern approach, utilizing a focused laser beam to intricately etch designs onto diverse wood surfaces. This cutting-edge technique enables precise and customizable engravings, achieved through the vaporization or burning of wood, ensuring unparalleled speed and accuracy.

Tools for Laser Engraving Wood
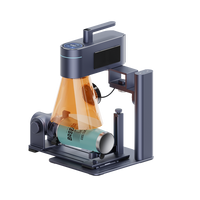
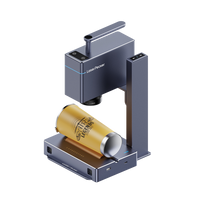
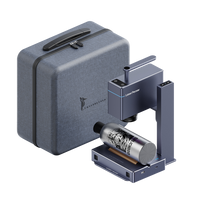
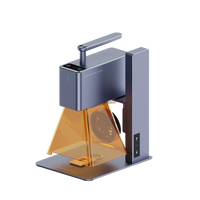
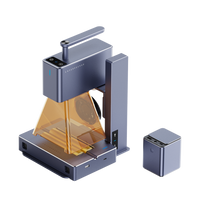
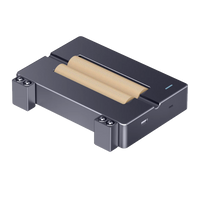
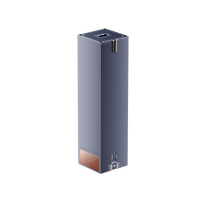
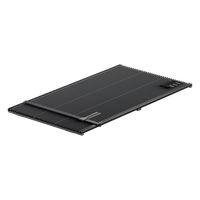
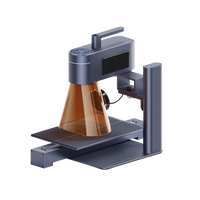
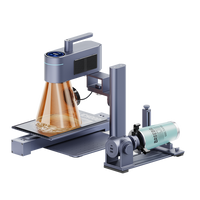
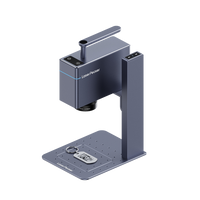
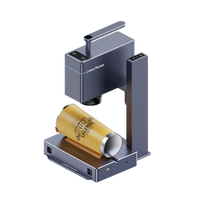
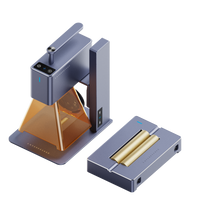
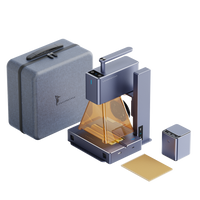
Wood Laser Engraving Machine: Choose a specialized wood laser engraving machine like LaserPecker 4 designed to engrave onto wood.
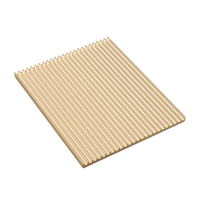
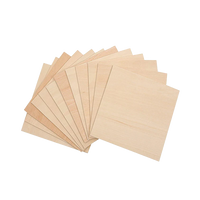
Wood Materials: There are various types of wood suitable for laser engraving, including hardwoods, plywood, and veneers.
Design Software: LaserPecker Design Space are used to create or upload design files to be engraved onto the wood surface.
Safety Gear: Don't forget to use LaserPecker safety goggles and protective equipment to shield against laser exposure and wood debris.
How to Laser Engrave Wood
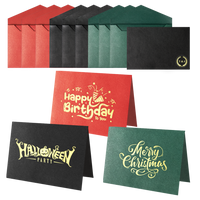
Step 1 - Design Creation or Selection: Create a design using graphic software compatible with the laser engraving machine or choose pre-existing designs that are suitable for wood engraving.

Step 2 - Preparation of Wood: Prepare the wood surface by cutting it to fit the laser engraving machine's bed. Ensure the wood is clean, smooth, and free from debris for optimal engraving results.
Step 3 - Setting Up the Laser Machine: Configure the laser engraving machine settings according to the type of wood being used, adjusting power, speed, and resolution settings based on the desired depth and intricacy of the engraving. For more info, please check our LaserPecker Craftzone.
Step 4 - Securing the Wood: Place and secure the wood onto the engraving bed of the machine, ensuring it remains stable and immobile during the engraving process.
Step 5 - Uploading and Initiating the Engraving: Upload the chosen design file to the laser engraving machine's software. Double-check settings and initiate the engraving process, allowing the laser to precisely etch the design onto the wood surface.
Step 6 - Monitoring and Quality Control: Supervise the engraving process to ensure the design is being etched accurately and according to the specifications. Make adjustments if needed during the engraving.

Step 7 - Post-Engraving Inspection: Once the engraving is complete, inspect the engraved surface for any imperfections or incomplete areas that might require refinements or touch-ups.
Step 8 - Optional Finishing: Optionally, apply finishes like varnish or lacquer to enhance the engraved design or protect the wood surface.
Video Guide on Laser Engraving Wood
Method 2: Engrave Wood by Hand (Carving)
Hand-engraving on wood, or wood carving, is an ancient method where craftsmen meticulously carve designs into wood surfaces. This traditional technique relies on precision and craftsmanship, enabling artisans to craft detailed and unique engravings using specialized tools and techniques.
Tools for Wood Engraving by Hand (Carving)
Chisels: Essential tools used for carving wood. They come in various shapes and sizes, each serving a specific purpose in the engraving process.
Gouges: Similar to chisels but featuring curved or rounded blades, ideal for shaping and hollowing out areas within the wood.
Mallet or Hammer: Used in conjunction with chisels and gouges to apply controlled force for cutting and carving.
Carving Knife: Provides precision for finer details and delicate work within the engraving.
Safety Gear: Protective gloves, goggles, and a dust mask are crucial for ensuring safety while working with sharp tools and wood dust.

How to Engrave Wood by Hand (Carving)
Step 1 - Design Selection and Preparation: Choose or create a design that suits the project. Transfer the design onto the wood surface using tracing paper, carbon paper, or by drawing it directly.
Step 2 - Wood Selection and Preparation: Select an appropriate wood type based on the project's requirements. Prepare the wood surface by smoothing it and ensuring it's free from imperfections.
Step 3 - Securing the Wood: Fix the wood securely in place using clamps or a vise to prevent movement while carving.
Step 4 - Start Carving: Use chisels, gouges, and carving knives to begin carving the design into the wood. Begin with outlining the design and gradually work on adding depth and details.
Step 5 - Controlled Movements: Employ controlled and deliberate movements with the tools to achieve precision. Pay attention to the wood grain and work with it to prevent splintering or damaging the wood.
Step 6 - Refinement and Detailing: Once the basic outline is carved, refine the details, adjust depths, and smooth rough areas to enhance the overall quality of the engraving.
Step 7 - Finishing Touches: Sand the engraved surface to achieve a smooth finish. Apply a wood finish or sealant to protect the engraving and enhance its appearance.
Video Guide on Engraving Wood by Hand
Method 3: Engrave Wood with A Dremel (Power Tool)
Engraving wood with a Dremel, a versatile rotary tool, brings a modern and efficient way to carve intricate designs. The Dremel, equipped with diverse attachments and bits, lets artisans and hobbyists craft detailed engravings with precision and speed.
Tools for Wood Engraving with a Dremel
Dremel Rotary Tool: A high-speed, handheld power tool with interchangeable accessories and bits designed for engraving, carving, and detailing.
Engraving Bits: Specific attachments designed for fine detailing and engraving on wood.
Safety Gear: Safety glasses, gloves, and a dust mask or respirator to protect against wood particles and debris.
Woodworking Clamps: Used to secure the wood piece in place during engraving, preventing movement and ensuring stability.

How to Engrave Wood with a Dremel
Step 1 - Design Selection and Preparation: Choose or create a design suitable for the wood engraving project. Transfer the design onto the wood surface using tracing paper or by drawing it directly.
Step 2 - Wood Selection and Preparation: Choose an appropriate type of wood for the project. Ensure the wood surface is clean, smooth, and free from imperfections before starting the engraving process.
Step 3 - Secure the Wood: Use woodworking clamps to secure the wood firmly in place, providing stability while engraving and preventing unnecessary movement.
Step 4 - Selecting the Right Bit: Choose the appropriate engraving bit for the Dremel based on the intricacy of the design and the depth required for the engraving.
Step 5 - Engraving Process: Hold the Dremel tool with a steady hand and begin engraving the design onto the wood surface. Start by outlining the design and then gradually fill in details and depth.
Step 6 - Precision and Control: Maintain consistent and deliberate movements while engraving, ensuring an even depth and detailing throughout the design. Adjust the Dremel's speed and pressure as necessary for different intricacies within the engraving.
Step 7 - Detail Refinement: Focus on refining intricate details, adjusting depths, and smoothing any rough areas to elevate the overall quality and precision of the engraving. Take intermittent breaks to clear away debris for improved visibility and accuracy.
Step 8 - Final Finishing: Following the completion of the engraving process, gently sand the engraved surface to eliminate rough edges or imperfections. Apply a wood finish or sealant to safeguard the engraving and augment its visual appeal, providing a polished and protected final product.
Video Guide on Engraving Wood with a Dremel
Method 4: Engrave Wood with Cricut Maker (Blade Engraving Machine)
Engraving wood using a Cricut Maker introduces a modern, automated way to create intricate designs. The Cricut Maker, with specialized blades and precise cutting technology, provides a user-friendly approach for engraving detailed designs on various types of wood.
Tools for Wood Engraving with Cricut Maker
Cricut Maker Machine: An automated cutting machine equipped with a variety of blades, including the fine-point blade and engraving tip specifically designed for wood engraving.
Wood Sheets or Blanks: Various types of wood sheets or blanks suitable for the Cricut Maker, such as basswood, balsa wood, or other thin wood materials.
StrongGrip Mat: A specialized adhesive mat designed to secure the wood material in place during the engraving process.
Computer or Mobile Device: Used to create and upload design files to the Cricut Design Space software.
Sandpaper and Wood Finish (Optional): For refining the engraved surface and applying a protective finish.

How to Engrave Wood with Cricut Maker
Step 1 - Design Creation or Selection: Create or select a design suitable for wood engraving using design software compatible with the Cricut Maker, or choose designs available in the Cricut Design Space.
Step 2 - Preparation of Wood and Material Setting: Prepare the wood surface by cutting it to fit the StrongGrip Mat of the Cricut Maker. Fix the wood securely onto the mat, ensuring it's firmly in place.
Step 3 - Upload and Configure Design: Use the Cricut Design Space software to upload the chosen design file and configure the settings for wood engraving, selecting the appropriate blade or engraving tip.
Step 4 - Loading the Machine: Insert the chosen blade or engraving tip into the Cricut Maker. Follow the machine's instructions to load the mat with the wood into the machine.
Step 5 - Engraving Process: Initiate the engraving process through the Cricut Design Space software. The Cricut Maker will then precisely engrave the selected design onto the wood surface, following the uploaded design file.
Step 6 - Unload and Refinement: Once the engraving is complete, carefully remove the wood from the machine. Use sandpaper if necessary to refine the engraved surface and remove any residual imperfections.
Step 7 - Applying Finish (Optional): If desired, apply a wood finish or sealant to protect the engraved surface and enhance its appearance.
Video Guide on Engraving Wood with Cricut Maker
Method 5: Engrave Wood with A CNC Router
Wood engraving using a CNC (Computer Numerical Control) router presents a sophisticated and automated method for carving intricate designs onto wood surfaces. The CNC router utilizes computer-controlled precision to execute detailed engravings with accuracy and consistency, making it an ideal choice for both professional craftsmen and hobbyists.
Tools for Wood Engraving with a CNC Router
CNC Router Machine: A computer-controlled cutting machine equipped with a rotating cutting tool or bit for engraving designs onto wood.
Computer with Design Software: Used to create or upload design files that are compatible with the CNC router.
Wood Materials: Various types of wood suitable for CNC routing, including hardwoods, softwoods, and plywood.
Workholding Equipment: Clamps or vacuum hold-down systems to secure the wood firmly onto the CNC router's bed during the engraving process.

How to Engrave Wood with a Router
Step 1 - Design Creation or Selection: Create a design using design software compatible with the CNC router or select pre-existing designs suitable for wood engraving.
Step 2 - Preparing the Design File: Convert the design into a format compatible with the CNC router software (such as G-code) and set parameters for toolpaths, cutting depths, and speeds.
Step 3 - Wood Preparation: Prepare the wood material by cutting it to fit the CNC router's bed. Ensure the wood surface is clean, flat, and properly secured for the engraving process.
Step 4 - Setting Up the CNC Router: Load the design file into the CNC router's software. Install and calibrate the appropriate cutting tool or bit based on the engraving specifications.
Step 5 - Securing the Wood: Securely fix the wood material onto the CNC router's bed using clamps or a vacuum hold-down system to prevent movement during the engraving.
Step 6 - Machine Calibration and Test Run: Perform a test run to ensure the CNC router is properly calibrated and the engraving path aligns accurately with the design on the wood surface.
Step 7 - Initiating the Engraving: Start the CNC router, allowing the machine to follow the programmed toolpaths and carve the design onto the wood surface with precision.
Step 8 - Monitoring and Inspection: Supervise the engraving process to ensure accuracy and quality. Make adjustments as needed to the CNC router settings or pause for any necessary refinements.
Step 9 - Post-Engraving Inspection: Once the engraving is complete, inspect the wood surface for any imperfections or incomplete areas that may require additional touch-ups or refinements.
Video Guide on Engraving Wood with a Router
Method 6: Wood Burning (Pyrography)
Wood burning, also known as pyrography, is an art form that involves creating intricate designs or patterns on wood surfaces using controlled heat. This technique has been practiced for centuries, allowing artisans to create beautiful and detailed artworks, designs, or personalized items on various types of wood.
Tools for Wood Burning (Pyrography)
Wood Burning Tool (Pyrography Pen): A specialized tool with interchangeable tips or nibs that heat up to create burn marks on the wood. Tips come in various shapes and sizes for different effects.
Wood Surfaces: Various types of wood suitable for pyrography, such as basswood, pine, birch, or hardwoods, providing different textures and colors.
Carbon Paper or Tracing Paper: Used to transfer designs onto the wood surface before burning.
Safety Gear: Heat-resistant gloves, safety goggles, and a well-ventilated workspace to protect against burns and fumes.

How to Engrave Wood Burning (Pyrography)
Step 1 - Design Selection and Transfer: Choose or create a design suitable for wood burning. Transfer the design onto the wood surface using carbon paper or tracing paper by tracing or drawing the design directly onto the wood.
Step 2 - Preparing the Wood: Prepare the wood surface by sanding it to ensure a smooth and clean canvas for the wood burning process. Remove any debris or rough spots that could affect the burning.
Step 3 - Selecting the Right Tip: Choose the appropriate tip or nib for the wood burning tool based on the intricacy and style of the design you want to create.
Step 4 - Testing and Adjusting Heat: Test the wood burning tool on a scrap piece of wood to determine the heat intensity and how the chosen tip interacts with the wood. Adjust the heat settings as needed for desired effects.
Step 5 - Begin Wood Burning: With a steady hand and controlled movements, start burning the design onto the wood surface. Use consistent pressure and pace to achieve uniform and precise burn marks.
Step 6 - Shading and Detailing: Utilize different techniques such as varying pressure, strokes, and tip angles to create shading, depth, and finer details within the design.
Step 7 - Cooling and Finishing: Allow the wood to cool down after completing the burning process. Optionally, finish the wood surface with a sealant or finish to protect the artwork and enhance its appearance.
Video Guide on Engraving Wood Burning
Method 7: Kolrosing Wood Engraving
Kolrosing is a traditional Scandinavian wood carving technique used to create intricate designs, patterns, or decorative elements on wooden surfaces. Originating from the Nordic regions, kolrosing involves incising or scoring the wood with fine lines using a sharp knife and filling these cuts with various materials like powdered pigments, coffee grounds, or even ashes to add contrast and depth to the designs.
Tools for Kolrosing Wood Engraving
Sharp Knife or Kolrosing Knife: A thin, sharp knife with a straight blade specifically designed for creating fine incisions in wood.
Wood Surface: Various types of wood, preferably softwoods like basswood or pine, suitable for kolrosing due to their ease of cutting and marking.
Materials for Filling: Substances such as coffee grounds, powdered pigments, ashes, or other fine materials used to fill the incisions and create contrast.

How to Kolrose Wood Engraving
Step 1 - Design Planning: Decide on a design or pattern suitable for kolrosing. Simple geometric shapes, lines, or small decorative motifs work well for this technique.
Step 2 - Wood Preparation: Prepare the wooden surface by ensuring it's clean, smooth, and free from imperfections. This provides a suitable canvas for the kolrosing process.
Step 3 - Knife Incisions: With a steady hand, use the sharp knife to carefully make fine incisions or cuts on the wood surface following the planned design. Keep the cuts shallow to ensure the filling materials adhere properly.
Step 4 - Filling the Incisions: Apply the chosen filling material into the incisions on the wood surface. Use a small tool or finger to press the material gently into the cuts, ensuring they are adequately filled.
Step 5 - Smoothing and Cleanup: After filling the incisions, gently clean off excess material from the wood surface with a soft brush or cloth. Ensure the filled lines are clean and distinct.
Step 6 - Optional Finishing: Optionally, apply a finish or sealant to protect the engraved design and enhance the appearance of the wood surface.
Step 7 - Allowing Drying or Setting: Let the filled incisions dry or set, depending on the filling material used, to ensure they remain in place and create a lasting design.
Video Guide on Kolrosing Wood Engraving
FAQs About Wood Engraving
1. What types of wood are suitable for engraving?
Woods like basswood, pine, birch, cherry, maple, and walnut are commonly used due to their hardness, grain patterns, and ease of engraving.
2. What wood is best for engraving?
Alder - According to Aplazer.com, this wood passes all the tests. It features a light color, has a supple texture, and has minimal streaking. Make Alder your top choice for laser engraving projects.
3. Is plywood good for engraving?
Yes, plywood can be used for engraving, but the quality varies based on the wood veneers and adhesive used. High-quality plywood with smooth surfaces and minimal voids is preferable.
4. What safety precautions should be taken during wood engraving?
Wearing safety goggles, gloves, and a dust mask to protect against wood particles, using tools correctly, and ensuring a well-ventilated workspace are essential safety measures.
5. What are the differences among wood engraving, wood carving, etching and printing?
Wood Engraving: Involves creating designs or patterns on the surface of wood using techniques like carving, burning, or etching.
Wood Carving: Involves cutting and shaping wood to create three-dimensional sculptures or reliefs.
Etching: Refers to the process of creating designs or patterns by using acid or abrasive substances to cut into the surface of the wood.
Printing: Involves using woodblocks or plates with engraved designs to produce printed images or illustrations.
6. How to Engrave Wood at Home?
Engraving wood at home traditionally involves using hand tools such as chisels and gouges. However, for a contemporary and precise method, a mini laser engraver proves to be an excellent choice. Operating it is akin to using a printer, offering simplicity and accuracy in the engraving process.
Conclusion
Wood engraving presents a captivating art form that offers diverse techniques, from traditional hand tools like chisels to modern methods like laser engraving. This craft allows for intricate designs, personalization of items, and the creation of stunning décor pieces. It demands attention to detail, patience, and skill, making it a rewarding pursuit for both hobbyists and professionals.
Whether embracing tradition or adopting innovation, wood engraving invites exploration and creativity. It transforms wood surfaces into extraordinary works of art, showcasing the fusion of tradition and innovation in the realm of woodworking.


